Friday, June 8, 2012

The Chicken Shack

I know I haven't mentioned this yet but we are taking on a new venture....Chickens. 
Okay so don't judge but the chickens have been living in our house.  NOT literally running around the house, eww gross, but in a large aquarium until they got bigger.
Well, when the twins came running through the house yelling, "a chicken is out a chicken is out" it finally came time to build their home.  They are getting big and stinky, and boy are they messy.

I've been checking out http://www.backyardchicken.com/ trying to learn more and more about our chickens.  From what I've learned I'm pretty sure they are Bantams, which for our purposes is not good.  We want eggs, lots and lots of eggs, and Bantams are not good egg layers.  From what I've read they're not good eating either, small and gammy.  So what are they good for? Showing.  Really??  I guess I could let the twins show one at the county fair but what a let down.  We may have to get a couple good egg laying hens.

So here are some pictures of two major amatures building the chicken coop.  We had only one small snafu when trying to stretch the chicken wire but once we got past that I think we did a pretty good job!  I'm proud of our coop!!

from firewood shelter, to Willy Jeep shelter, to The Chicken Shack

Tall enough for my husband to walk in

framing the door


wow that looks aweful

Keep pulling Eric but it's not helping

straightened out and getting staples

phew done with the chicken wire

adding a metal sheeting back to protect the chickens from the elements


Done just a few details but the chickens have their new home!

their ramp
Just a small disclaimer.  I realize all the pictures so my Sweetness working but I would like to say I worked too I just took all the pictures hence why you don't see me!!

Meet Our Chickens

Cute little girls holding cute little chicks, so much cuteness!

 Autumn

just a week old such a cutey

About 4 weeks old getting so pretty

7 weeks old.  Autumn is a rooster but he's so sweet we are hoping he keeps his sweet demeanor

 Dodo

By far our friendliest chicken

 Lady Gaga

Our shy baby

 Dipstick


I think this is a hen, she's very busy and curious, so hard to get a picture of because she's always on the run


 Blanche

I've been told he's a Rosecomb Bantam rooster.  He's mean and bites a lot!


Wednesday, May 30, 2012

M is for...

Since we ended our 3 year old curriculum with ABC Jesus Loves Me I realize we have a long span of time before the girls begin attending preschool next year.  So I decided this summer we should review our alphabet letters and some bible stories that we either didn't get to spend enough time on or we missed altogether.

So we're kind of in the middle of the alphabet right now but we will circle back and pick-up the rest of the letters and hopefully get them all in by the end of summer!

M is for...

Poster: 

(we will still be using the posters from ABC Jesus Loves Me I love the size of the letter, they're already set up and ready to print, and the girls are familiar with them so why not)

M is for Macaroni


Snack Time:

Mud in a Mug


Quick Easy and Super Tasty!!
The recipe is actually Brownie for One I found on Food.com one day when I was craving brownies.  When cooked up it looks a lot like Mud and the girls really got a kick out of it.
Ingredients:
1/4 cup flour
1/4 cup sugar
2 Tbsp cocoa
2 Tbsp water
2 Tbsp oil
1/4 tsp vanilla
dash of salt

Directions:
Combine all ingredients in a mug and microwave for 1 minute!  Let cool it comes out very hot.

Bible Story/Character:

M is for Moses


Here is a craft we did last November!  The girls loved making these little paper dolls!  Moses and the Parting of the Red Sea Activity

Books

M is for...

Missouri Conservationist for kids Xplor fyi this magazine along with Missouri Conservationsist is free to Missouri residents!!  Click on the link and sign up to receive your free subscription!

Me & Neesie- sweet book about a little girl whose about ready to start Kindergarten and her imaginary friend! 


The Mixed up Chameleon!  I can't say enough about Eric Carle books.  I love his artwork, it also lend for a great art lesson in collage work.

The Movable Mother Goose.  This is a Robert Sabuda book, another illustrator that I admire.  This is not one to let your kids flip through, however, it's great to sit down with, read, and be amazed!

Art


M is for Monster Jam Painting


We decided to make this an outdoor activity.  I could see it getting out of hand really fast. It's really self explanatory but I'll describe what we did anyway.
You will need both a large piece of paper to make the painting on and something else to spread the paint on.  We just happened to have pizza for dinner so I took the pizza box apart and it was perfect.  I put a long line of paint down then added a little water to thin it out.  Then the girls drove their trucks through the paint or "mud" and made tracks on the paper.

This was always a favorite activity when I taught Kindergarten and just for a side note Monster Jam trucks aren't the only trucks that will make tracks.  I actually got some really cheap ones from Walgreens when I did this with my Kindergarten classes because I knew we'd be doing it over and over again all day and I wasn't sure how much the cars could take but even then it all came off easily with just water.

still more to come....

Saturday, May 26, 2012

Chore Chart

So when is the right time to start chores?  The twins love helping me out and will often argue over who gets to do what, however, we struggle getting them to do the daily responsibilities they need to do.  They should be moving into a stage where mommy and daddy don't tell them everyday to do certain jobs.  So how do we remind them without actually telling them, how do we turn those "chores" into habits?  Well we chose to go with positive reinforcement and a visual reminder and I created a "chore chart"

I decided the most chores the girls need per day is 4.  3 of those chores are something they need to do daily; brush their teeth, make their beds, and pick up their toys.  I thought of two more chores that they can take turns on that they are old enough or capable of handling; sweep the kitchen floor, and feed their dog, Sparky.

Once they've mastered a chore and it becomes a habit then we will remove that from their chore list and add something new.  For example Idid not make "get dressed" a chore because they already know to do this.  They may not do it first thing every morning but they know it is something they have to do daily.

Since I wanted to make the chores interchangeable I created a chart that can easily be changed or updated!
Materials Needed:
Chore Charts
Daily Duty Page (Today I need to:)
4 Clothespins per child
Glue
Stickyback Velcro
Dry Erase Markers
Image and Words for each Chore
Laminating Machine


Instructions:
First I started to make a chore chart on a Microsoft Spreadsheet but as I was searching the internet for designs I like I came across this website!  http://www.freeprintablebehaviorcharts.com/chorecharts4-10.htm
I let the girls choose what character they wanted!
Kirby chose Cars and Lillian chose Tangled.

Next I found images I liked in Microsoft Office.  I put the words under the image stating the task.  I would have just used the words but since the twins can't read yet I decided to add images for them to understand.
I printed two sets, one I seperated the words from the picture and the other I kept the words under the pictures.


I cut all the pieces using my paper cutter, laminated them then hand cut rounding off the corners.


I glued the words and pictures that were seperated onto the clothspins.


I put the glue on the pin being careful to keep it on the wood part only.


Be mindful when adding your words so you don't glue them all on up-side-down like I did, doh!
The second set is for the actual chart.  I laminated the charts, then put the hook side of the Velcro on the spaces where you can write the daily chores.  I put the loop side of the Velcro on the back of the chore image.  I decided to use Velcro rather then glue them on so that the chores can be changed in the future as needed.


I decided to laminate the chart one for durability but also so it can be written on with a dry erase marker.  I thought about using star stickers for each day they complete their chore but then I'll be printing off a chart each week.  So on right side of the chart I put another hook part of the Velcro on the edge and I wrapped the dry erase marker in the loop side of the Velcro.  Kirby chose an orange marker and Lillian chose blue.


I made a "daily duty" page with both girls names on it.  In the morning their chores for the day will be on this page and when they complete that chore they can move it over to the matching image on their chore chart.  i made Lillian's name blue and Kirby's orange to match their markers.


Each girls got Brush your teeth, Make your bed, and Pick up toys.  The other two chores can be changed each week.  Lillian got Feed Sparky, and Kirby got Sweep the floor for this week.


I hung them on the wall using 3 M Command Removable Mounting Strips.  I used two strips per chart putting on in the middle and the other on the far right.  If you put it on the left they won't be able to add the clothepin because there won't be enough space to pull away from the wall.

So obviously when flipped over the strips will be on the left and in the middle.

I put them on a wall in our hallway which is next to the bathroom and their bedroom.  They are at their level so they can see what needs to be done and will be reminded every time they walk by.  With each chore they complete as they move it over to their chore chart a check will be made under that day of the week so at the end of the week we can track their progress.


Friday, May 18, 2012

StressLess Momma: We Love to Paint!

The girls love painting!! They ask to do it all the time and I always put it off. I will admit I don't share their love for the hobby.  It's not the actual process that I dislike because actually painting is kind of fun, it's the aftermath, the mess.

So I have a couple little tricks that make it a little less "painful."


supplies

I buy both finger paint and kid paint for the kids and let them choose which one they want to use.  Usually they'll make a couple paintings with both.

We use freezer paper for our paintings.  It's super cheap compared to painting or finger paint paper and is pretty much the same thing!!  Use the dull side for the kid paint and the shiny side for the finger paint!

When it comes to the kid paint (I think it's probably similiar to tempera) my kids are still in the stage where they like to mix and they don't clean their brush so well.  So I don't allow them to dip their brush right in the paint jar or else they will instantly ruin the paint.  Instead we use a styrofoam egg carton!  I put a small dallop of paint in egg section and if they mix it, so what?

just getting started

muddled up colors


painting with a spoon

stamping with a plastic cup
Who says you have to paint with a brush?  Give them a variety of "tools"! Lillian used a spoon, fork, and plastic cup.  You can also give them a cut up sponge, paper towel, suction cups. straws.

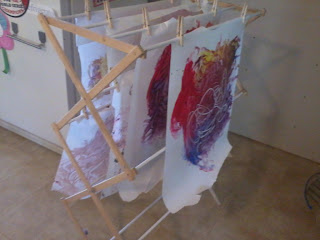
and finally where do you dry all their creations?
A laundry drying rack of course!!


Don't make the same mistake I did and start at the top!  Start on the inside and lower rack first then move up, that way you don't have to lean over wet paintings to hang the rest.
keeping it all together

love the handles, we can take our supplies anywhere


A couple more ideas!

Make ice cube paint:
1. Mix equal parts kid paint and water.
2. Put it in an ice tray or popsicle mold to freeze
3. Pop em out and paint away. 
When they are finished you can put the cubes in a ziplock bag and re-freeze!

Batik or Wax Resist
Batik is an artistic method where artist block out a certain section using melted wax then dye the rest.  Later they remove the wax to reveal a blanked out section.  They may do this multiple times to build color on color and design.
This is a fun "magical" technique for kids.
Supplies:
paper
crayons
watercolor paint

1. Draw a design with the crayons.  They can use white crayons to write a "secret" message or drawing.
2. Paint over the entire paper with watercolor!  The areas of crayon will resist the paint!

Marble Painting
Supplies:
marbles
paper
box with high sides
kid paint (tempera)

1. Cut the paper to fit inside the box.
2. Either dip the marbles in paint or put small blobs of paint on the paper.
3. Put the marbles in the box on top of the paper then tip the box from side to side allowing the marbles to roll around and make a "marble" painting.

Monster Jam Painting

Supplies:
Monster Jam trucks
kid paint (tempera)
paper plates and plastic spoon
large sheet of paper (the freezer paper would work for this but I love to use the brown drop cloth paper from the hardware store)

1. Drop one color of paint per paper plate and spread it out a little using the spoon.
2. Help the kids run the trucks tires through the paint so they are completely coated all the way around.
3. Drive the trucks all over the paper re-applying paint as needed!